Ten One – 90 Days
Ten One – 90 Days
=====
Here’s a step-by-step guide for setting up a subdomain on phoenix72.com in IONOS:
1. Log in
- Go to IONOS login and sign into your IONOS Control Panel.
2. Open Your Domain Settings
- In the dashboard, click Domains & SSL.
- Locate phoenix72.com in your list of domains.
- Click the gear ⚙️ or the Manage Domain option.
3. Add a Subdomain
- Click Subdomain (sometimes under “Add Subdomain”).
- Enter the subdomain you want.
Example:- blog.phoenix72.com
- shop.phoenix72.com
- members.phoenix72.com
4. Point the Subdomain
You’ll be asked where the subdomain should point:
- To a folder on your hosting space
- If you’ve uploaded files via the File Manager or FTP, choose the folder.
- Example: /blog folder → blog.phoenix72.com.
- To a different destination (A/AAAA record or external site)
- Enter the IP address (for another server) or CNAME (for another host, like WordPress.com, Shopify, etc.).
5. Upload Content (if hosting yourself)
- Use the IONOS File Manager (in Hosting > Webspace Explorer) or an FTP client.
- Upload your HTML/PHP files or CMS installation into the subdomain’s target folder.
6. Test
- It may take a few minutes (sometimes up to 24 hours) for DNS changes to propagate.
- Visit your subdomain in the browser to confirm.
✅ Quick Example:
If you want a WordPress blog at blog.phoenix72.com:
- Create subdomain blog.phoenix72.com.
- Point it to a folder /blog.
- Use the IONOS 1-Click Installer to install WordPress into that folder.
Here’s a mini-tutorial (with example screenshots) to walk you through setting up a subdomain for phoenix72.com in IONOS. The UI might sometimes differ slightly depending on your plan or IONOS version, but the general steps should match up.
🧰 Prerequisites & tips
- You need to have control of the domain phoenix72.com in your IONOS account.
- If your hosting (web space) is on IONOS, ensure you have webspace/folder available to attach the subdomain.
- DNS propagation may take some time (minutes to a few hours, occasionally up to 24 hours).
- Keep ready any IP address or target host if you’re pointing the subdomain externally (via A record or CNAME).
Step-by-step: Create the subdomain
- Log in to IONOS
Go to the IONOS dashboard and log in with your credentials. - Navigate to “Domains & SSL”
In your dashboard, find the section (or menu item) labeled Domains & SSL (sometimes just “Domains”). - Select your domain
Find phoenix72.com in your list of domains.
Click its gear icon or Manage option (or similar) to open domain settings. - Go to the “Subdomains” tab
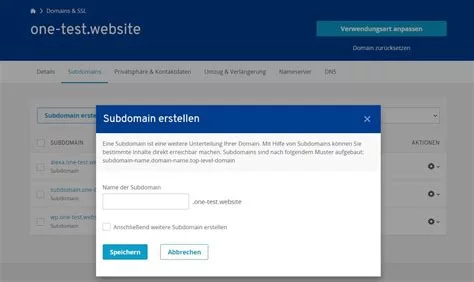
Within the domain’s settings, there should be a tab or link for Subdomains or Create Subdomain.
(In one screenshot above you see “Subdomain erstellen” / “Create Subdomain.”) - Create a new subdomain
- Enter the name of your subdomain (for example, blog, shop, members, etc.).
- Confirm by clicking Save or Create.
- Optionally, you may check “Create another subdomain” if doing multiple.
- (Screenshot examples: top left & top right in the carousel)
- Assign its destination / target
After creating, you’ll need to set where that subdomain points:- Internal folder / webspace: If hosting on IONOS, connect the subdomain to a directory (e.g. /blog folder).
- External target: If pointing to another server or host, you may set an A record (IP address) or CNAME (alias to a hostname).
- In IONOS, this is sometimes done by clicking “Adjust Destination” or “Use domain / Connect to webspace”.
- (If needed) Add DNS record manually
If IONOS doesn’t auto-add it, go to the DNS settings for phoenix72.com:- Click Add Record
- Choose Type A (for IP) or CNAME (for hostname alias)
- In Host name, specify your subdomain (e.g. blog)
- In Points to, enter the target (IP or hostname)
- Save it
(One screenshot shows “Add a DNS record” with Host Name, Points to, TTL)
- Click Add Record
- Wait and test
After saving, wait for DNS propagation.
Try visiting blog.phoenix72.com (or whatever subdomain you made).
If correctly configured, it should show the content from the target location.